Source for this related gaming news is as simple as you click This website and read another one!
Source for this related gaming news is as simple as you click This website and read another one!
Source for this related gaming news is as simple as you click This website and read another one!
Source for this related gaming news is as simple as you click This website and read another one!
Source for this related gaming news is as simple as you click This website and read another one!
Source for this related gaming news is as simple as you click This website and read another one!
Source for this related gaming news is as simple as you click This website and read another one!
Source for this related gaming news is as simple as you click This website and read another one!
Source for this related gaming news is as simple as you click This website and read another one!
Source for this related gaming news is as simple as you click This website and read another one!
Source for this related gaming news is as simple as you click This website and read another one!
Source for this related gaming news is as simple as you click This website and read another one!
Source for this related gaming news is as simple as you click This website and read another one!
Source for this related gaming news is as simple as you click This website and read another one!
Source for this related gaming news is as simple as you click This website and read another one!
Source for this related gaming news is as simple as you click This website and read another one!
Source for this related gaming news is as simple as you click This website and read another one!
Source for this related gaming news is as simple as you click This website and read another one!
Source for this related gaming news is as simple as you click This website and read another one!
Source for this related gaming news is as simple as you click This website and read another one!
Source for this related gaming news is as simple as you click This website and read another one!
Source for this related gaming news is as simple as you click This website and read another one!
Source for this related gaming news is as simple as you click This website and read another one!
Source for this related gaming news is as simple as you click This website and read another one!
Source for this related gaming news is as simple as you click This website and read another one!
Source for this related gaming news is as simple as you click This website and read another one!
Source for this related gaming news is as simple as you click This website and read another one!
Source for this related gaming news is as simple as you click This website and read another one!
Source for this related gaming news is as simple as you click This website and read another one!
Source for this related gaming news is as simple as you click This website and read another one!
Source for this related gaming news is as simple as you click This website and read another one!
Source for this related gaming news is as simple as you click This website and read another one!
Source for this related gaming news is as simple as you click This website and read another one!
Source for this related gaming news is as simple as you click This website and read another one!
Source for this related gaming news is as simple as you click This website and read another one!
Source for this related gaming news is as simple as you click This website and read another one!
Source for this related gaming news is as simple as you click This website and read another one!
Source for this related gaming news is as simple as you click This website and read another one!
Source for this related gaming news is as simple as you click This website and read another one!
Source for this related gaming news is as simple as you click This website and read another one!
Source for this related gaming news is as simple as you click This website and read another one!
Source for this related gaming news is as simple as you click This website and read another one!
Source for this related gaming news is as simple as you click This website and read another one!
Source for this related gaming news is as simple as you click This website and read another one!
Source for this related gaming news is as simple as you click This website and read another one!
Source for this related gaming news is as simple as you click This website and read another one!
Source for this related gaming news is as simple as you click This website and read another one!
Source for this related gaming news is as simple as you click This website and read another one!
Source for this related gaming news is as simple as you click This website and read another one!
Source for this related gaming news is as simple as you click This website and read another one!
Source for this related gaming news is as simple as you click This website and read another one!
Source for this related gaming news is as simple as you click This website and read another one!
Source for this related gaming news is as simple as you click This website and read another one!
Source for this related gaming news is as simple as you click This website and read another one!
Source for this related gaming news is as simple as you click This website and read another one!
Source for this related gaming news is as simple as you click This website and read another one!
Source for this related gaming news is as simple as you click This website and read another one!
Source for this related gaming news is as simple as you click This website and read another one!
Source for this related gaming news is as simple as you click This website and read another one!
Source for this related gaming news is as simple as you click This website and read another one!
Source for this related gaming news is as simple as you click This website and read another one!
Source for this related gaming news is as simple as you click This website and read another one!
Source for this related gaming news is as simple as you click This website and read another one!
Source for this related gaming news is as simple as you click This website and read another one!
Source for this related gaming news is as simple as you click This website and read another one!
Source for this related gaming news is as simple as you click This website and read another one!
Source for this related gaming news is as simple as you click This website and read another one!
Source for this related gaming news is as simple as you click This website and read another one!
Source for this related gaming news is as simple as you click This website and read another one!
Source for this related gaming news is as simple as you click This website and read another one!
Source for this related gaming news is as simple as you click This website and read another one!
Source for this related gaming news is as simple as you click This website and read another one!
Source for this related gaming news is as simple as you click This website and read another one!
Source for this related gaming news is as simple as you click This website and read another one!
Source for this related gaming news is as simple as you click This website and read another one!
Source for this related gaming news is as simple as you click This website and read another one!
Source for this related gaming news is as simple as you click This website and read another one!
Source for this related gaming news is as simple as you click This website and read another one!
Source for this related gaming news is as simple as you click This website and read another one!
Source for this related gaming news is as simple as you click This website and read another one!
Source for this related gaming news is as simple as you click This website and read another one!
Source for this related gaming news is as simple as you click This website and read another one!
Source for this related gaming news is as simple as you click This website and read another one!
Source for this related gaming news is as simple as you click This website and read another one!
Source for this related gaming news is as simple as you click This website and read another one!
Source for this related gaming news is as simple as you click This website and read another one!
Source for this related gaming news is as simple as you click This website and read another one!
Source for this related gaming news is as simple as you click This website and read another one!
Source for this related gaming news is as simple as you click This website and read another one!
Source for this related gaming news is as simple as you click This website and read another one!
Source for this related gaming news is as simple as you click This website and read another one!
Source for this related gaming news is as simple as you click This website and read another one!
Source for this related gaming news is as simple as you click This website and read another one!
Source for this related gaming news is as simple as you click This website and read another one!
Source for this related gaming news is as simple as you click This website and read another one!
Source for this related gaming news is as simple as you click This website and read another one!
Source for this related gaming news is as simple as you click This website and read another one!
Source for this related gaming news is as simple as you click This website and read another one!
Source for this related gaming news is as simple as you click This website and read another one!
Source for this related gaming news is as simple as you click This website and read another one!
Source for this related gaming news is as simple as you click This website and read another one!
Source for this related gaming news is as simple as you click This website and read another one!
Source for this related gaming news is as simple as you click This website and read another one!
Source for this related gaming news is as simple as you click This website and read another one!
Source for this related gaming news is as simple as you click This website and read another one!
Source for this related gaming news is as simple as you click This website and read another one!
Source for this related gaming news is as simple as you click This website and read another one!
Source for this related gaming news is as simple as you click This website and read another one!
Source for this related gaming news is as simple as you click This website and read another one!
Source for this related gaming news is as simple as you click This website and read another one!
Source for this related gaming news is as simple as you click This website and read another one!
Source for this related gaming news is as simple as you click This website and read another one!
Source for this related gaming news is as simple as you click This website and read another one!
Source for this related gaming news is as simple as you click This website and read another one!
Source for this related gaming news is as simple as you click This website and read another one!
Source for this related gaming news is as simple as you click This website and read another one!
Source for this related gaming news is as simple as you click This website and read another one!
Source for this related gaming news is as simple as you click This website and read another one!
Source for this related gaming news is as simple as you click This website and read another one!
Source for this related gaming news is as simple as you click This website and read another one!
Source for this related gaming news is as simple as you click This website and read another one!
Source for this related gaming news is as simple as you click This website and read another one!
Source for this related gaming news is as simple as you click This website and read another one!
Source for this related gaming news is as simple as you click This website and read another one!
Source for this related gaming news is as simple as you click This website and read another one!
Source for this related gaming news is as simple as you click This website and read another one!
Source for this related gaming news is as simple as you click This website and read another one!
Source for this related gaming news is as simple as you click This website and read another one!
Source for this related gaming news is as simple as you click This website and read another one!
Source for this related gaming news is as simple as you click This website and read another one!
Source for this related gaming news is as simple as you click This website and read another one!
Source for this related gaming news is as simple as you click This website and read another one!
Source for this related gaming news is as simple as you click This website and read another one!
Source for this related gaming news is as simple as you click This website and read another one!
Source for this related gaming news is as simple as you click This website and read another one!
Source for this related gaming news is as simple as you click This website and read another one!
Source for this related gaming news is as simple as you click This website and read another one!
Source for this related gaming news is as simple as you click This website and read another one!
Source for this related gaming news is as simple as you click This website and read another one!
Source for this related gaming news is as simple as you click This website and read another one!
Source for this related gaming news is as simple as you click This website and read another one!
Source for this related gaming news is as simple as you click This website and read another one!
Source for this related gaming news is as simple as you click This website and read another one!
Source for this related gaming news is as simple as you click This website and read another one!
Source for this related gaming news is as simple as you click This website and read another one!
Source for this related gaming news is as simple as you click This website and read another one!
Source for this related gaming news is as simple as you click This website and read another one!
Source for this related gaming news is as simple as you click This website and read another one!
Source for this related gaming news is as simple as you click This website and read another one!
Source for this related gaming news is as simple as you click This website and read another one!
Source for this related gaming news is as simple as you click This website and read another one!
Source for this related gaming news is as simple as you click This website and read another one!
Source for this related gaming news is as simple as you click This website and read another one!
Source for this related gaming news is as simple as you click This website and read another one!
Source for this related gaming news is as simple as you click This website and read another one!
Source for this related gaming news is as simple as you click This website and read another one!
Source for this related gaming news is as simple as you click This website and read another one!
Source for this related gaming news is as simple as you click This website and read another one!
Source for this related gaming news is as simple as you click This website and read another one!
Source for this related gaming news is as simple as you click This website and read another one!
Source for this related gaming news is as simple as you click This website and read another one!
Source for this related gaming news is as simple as you click This website and read another one!
Source for this related gaming news is as simple as you click This website and read another one!
Source for this related gaming news is as simple as you click This website and read another one!
Source for this related gaming news is as simple as you click This website and read another one!
Source for this related gaming news is as simple as you click This website and read another one!
Source for this related gaming news is as simple as you click This website and read another one!
Source for this related gaming news is as simple as you click This website and read another one!
Source for this related gaming news is as simple as you click This website and read another one!
Source for this related gaming news is as simple as you click This website and read another one!
Source for this related gaming news is as simple as you click This website and read another one!
Source for this related gaming news is as simple as you click This website and read another one!
Source for this related gaming news is as simple as you click This website and read another one!
Source for this related gaming news is as simple as you click This website and read another one!
Source for this related gaming news is as simple as you click This website and read another one!
Source for this related gaming news is as simple as you click This website and read another one!
Source for this related gaming news is as simple as you click This website and read another one!
Source for this related gaming news is as simple as you click This website and read another one!
Source for this related gaming news is as simple as you click This website and read another one!
Source for this related gaming news is as simple as you click This website and read another one!
Source for this related gaming news is as simple as you click This website and read another one!
Source for this related gaming news is as simple as you click This website and read another one!
Source for this related gaming news is as simple as you click This website and read another one!
Source for this related gaming news is as simple as you click This website and read another one!
Source for this related gaming news is as simple as you click This website and read another one!
Source for this related gaming news is as simple as you click This website and read another one!
Source for this related gaming news is as simple as you click This website and read another one!
Source for this related gaming news is as simple as you click This website and read another one!
Source for this related gaming news is as simple as you click This website and read another one!
Source for this related gaming news is as simple as you click This website and read another one!
Source for this related gaming news is as simple as you click This website and read another one!
Source for this related gaming news is as simple as you click This website and read another one!
Source for this related gaming news is as simple as you click This website and read another one!
Source for this related gaming news is as simple as you click This website and read another one!
Source for this related gaming news is as simple as you click This website and read another one!
Source for this related gaming news is as simple as you click This website and read another one!
Source for this related gaming news is as simple as you click This website and read another one!
Source for this related gaming news is as simple as you click This website and read another one!
Source for this related gaming news is as simple as you click This website and read another one!
Source for this related gaming news is as simple as you click This website and read another one!
Source for this related gaming news is as simple as you click This website and read another one!
Source for this related gaming news is as simple as you click This website and read another one!
Source for this related gaming news is as simple as you click This website and read another one!
Source for this related gaming news is as simple as you click This website and read another one!
Source for this related gaming news is as simple as you click This website and read another one!
Source for this related gaming news is as simple as you click This website and read another one!
Source for this related gaming news is as simple as you click This website and read another one!
Source for this related gaming news is as simple as you click This website and read another one!
Source for this related gaming news is as simple as you click This website and read another one!
Source for this related gaming news is as simple as you click This website and read another one!
Source for this related gaming news is as simple as you click This website and read another one!
Source for this related gaming news is as simple as you click This website and read another one!
Source for this related gaming news is as simple as you click This website and read another one!
Source for this related gaming news is as simple as you click This website and read another one!
Source for this related gaming news is as simple as you click This website and read another one!
Source for this related gaming news is as simple as you click This website and read another one!
Source for this related gaming news is as simple as you click This website and read another one!
Source for this related gaming news is as simple as you click This website and read another one!
Source for this related gaming news is as simple as you click This website and read another one!
Source for this related gaming news is as simple as you click This website and read another one!
Source for this related gaming news is as simple as you click This website and read another one!
Source for this related gaming news is as simple as you click This website and read another one!
Source for this related gaming news is as simple as you click This website and read another one!
Source for this related gaming news is as simple as you click This website and read another one!
Source for this related gaming news is as simple as you click This website and read another one!
Source for this related gaming news is as simple as you click This website and read another one!
Source for this related gaming news is as simple as you click This website and read another one!
Source for this related gaming news is as simple as you click This website and read another one!
Source for this related gaming news is as simple as you click This website and read another one!
Source for this related gaming news is as simple as you click This website and read another one!
Source for this related gaming news is as simple as you click This website and read another one!
Source for this related gaming news is as simple as you click This website and read another one!
Source for this related gaming news is as simple as you click This website and read another one!
Source for this related gaming news is as simple as you click This website and read another one!
Source for this related gaming news is as simple as you click This website and read another one!
Source for this related gaming news is as simple as you click This website and read another one!
Source for this related gaming news is as simple as you click This website and read another one!
Source for this related gaming news is as simple as you click This website and read another one!
Source for this related gaming news is as simple as you click This website and read another one!
Source for this related gaming news is as simple as you click This website and read another one!
Source for this related gaming news is as simple as you click This website and read another one!
Source for this related gaming news is as simple as you click This website and read another one!
Source for this related gaming news is as simple as you click This website and read another one!
Source for this related gaming news is as simple as you click This website and read another one!
Source for this related gaming news is as simple as you click This website and read another one!
Source for this related gaming news is as simple as you click This website and read another one!
Source for this related gaming news is as simple as you click This website and read another one!
Source for this related gaming news is as simple as you click This website and read another one!
Source for this related gaming news is as simple as you click This website and read another one!
Source for this related gaming news is as simple as you click This website and read another one!
Source for this related gaming news is as simple as you click This website and read another one!
Source for this related gaming news is as simple as you click This website and read another one!
Source for this related gaming news is as simple as you click This website and read another one!
Source for this related gaming news is as simple as you click This website and read another one!
Source for this related gaming news is as simple as you click This website and read another one!
Source for this related gaming news is as simple as you click This website and read another one!
Source for this related gaming news is as simple as you click This website and read another one!
Source for this related gaming news is as simple as you click This website and read another one!
Source for this related gaming news is as simple as you click This website and read another one!
Source for this related gaming news is as simple as you click This website and read another one!
Source for this related gaming news is as simple as you click This website and read another one!
Source for this related gaming news is as simple as you click This website and read another one!
Source for this related gaming news is as simple as you click This website and read another one!
Source for this related gaming news is as simple as you click This website and read another one!
Source for this related gaming news is as simple as you click This website and read another one!
Source for this related gaming news is as simple as you click This website and read another one!
Source for this related gaming news is as simple as you click This website and read another one!
Source for this related gaming news is as simple as you click This website and read another one!
Source for this related gaming news is as simple as you click This website and read another one!
Source for this related gaming news is as simple as you click This website and read another one!
Source for this related gaming news is as simple as you click This website and read another one!
Source for this related gaming news is as simple as you click This website and read another one!
Source for this related gaming news is as simple as you click This website and read another one!
Source for this related gaming news is as simple as you click This website and read another one!
Source for this related gaming news is as simple as you click This website and read another one!
Source for this related gaming news is as simple as you click This website and read another one!
Source for this related gaming news is as simple as you click This website and read another one!
Source for this related gaming news is as simple as you click This website and read another one!
Source for this related gaming news is as simple as you click This website and read another one!
Source for this related gaming news is as simple as you click This website and read another one!
Source for this related gaming news is as simple as you click This website and read another one!
Source for this related gaming news is as simple as you click This website and read another one!
Source for this related gaming news is as simple as you click This website and read another one!
Source for this related gaming news is as simple as you click This website and read another one!
Source for this related gaming news is as simple as you click This website and read another one!
Source for this related gaming news is as simple as you click This website and read another one!
Source for this related gaming news is as simple as you click This website and read another one!
Source for this related gaming news is as simple as you click This website and read another one!
Source for this related gaming news is as simple as you click This website and read another one!
Source for this related gaming news is as simple as you click This website and read another one!
Source for this related gaming news is as simple as you click This website and read another one!
Source for this related gaming news is as simple as you click This website and read another one!
Source for this related gaming news is as simple as you click This website and read another one!
Source for this related gaming news is as simple as you click This website and read another one!
Source for this related gaming news is as simple as you click This website and read another one!
Source for this related gaming news is as simple as you click This website and read another one!
Source for this related gaming news is as simple as you click This website and read another one!
Source for this related gaming news is as simple as you click This website and read another one!
Source for this related gaming news is as simple as you click This website and read another one!
Source for this related gaming news is as simple as you click This website and read another one!
Source for this related gaming news is as simple as you click This website and read another one!
Source for this related gaming news is as simple as you click This website and read another one!
Source for this related gaming news is as simple as you click This website and read another one!
Source for this related gaming news is as simple as you click This website and read another one!
Source for this related gaming news is as simple as you click This website and read another one!
Source for this related gaming news is as simple as you click This website and read another one!
Source for this related gaming news is as simple as you click This website and read another one!
Source for this related gaming news is as simple as you click This website and read another one!
Source for this related gaming news is as simple as you click This website and read another one!
Source for this related gaming news is as simple as you click This website and read another one!
Source for this related gaming news is as simple as you click This website and read another one!
Source for this related gaming news is as simple as you click This website and read another one!


I love this! So clever, so easy, and so unique! Thanks!
Thanks Julie! Glad you loved it!
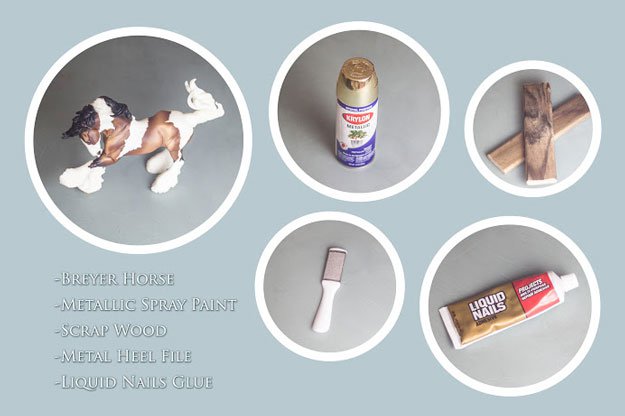
I’d suggest filling both sides of hollow horse, with lead fishing weights (pellets) to make them sturdy(ier) or more beefier and able to handle heavier loads of books. Great idea though, thank you!
That’s a great tip!
Great idea! I’m wondering if they are heavy enough for large books or meant to be used with smaller?
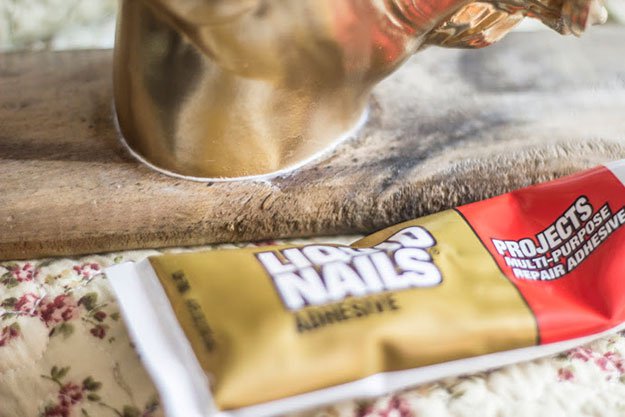
Hi Brandy, with the scrap woods used on this project, it’s meant for smaller books, but you can customize it still by using a larger wood to accommodate bigger books. Hope it helps 🙂
Love this so much. I’ve been looking for more horse projects! 😀
We’re glad you liked it Taylor! 🙂
I was wondering if filling each half with sand would work to make them “hefty” enough to stand up to larger and/or more books.
Love them…Thanks for the great tutorial!♡
Yes Tina you can also do that. We’re glad you enjoyed the tutorial 🙂